What's been and what's going to happen for 2016
Read MoreBlog
Find out a little about me and my stuff - updates will be sporadic.
Forever twirling, twirling toward the future.
Hey guys, warning long post ahead.
I've had to take some personal time off recently due to unforeseen circumstances but I'm back now and ready to produce some amazing stuff.
I've been back to the drawing board with my D&D Taj Packs and there are a lot more things to do than I thought. Initially it was just going to be a character pack but ever since playing 5ed I've been adding to the pack and it's grown monstrously.
I have plans to release the following packs: Base Character Pack, 2nd Character Pack, Travelers Pack, Base Dungeon Pack, Dungeon Magic Pack, Monsters Forest Pack, Monsters Dungeon Pack, Monsters Cave Pack, Animal Forest Pack, Animal Dungeon Pack, Animal Cave Pack, Village Base Pack, 2nd Village Pack, and a Village Street Pack. So a total of 14 packs - about 125 items in total.
So to kick off this stupendous and horrific adventure I've made potion bottles for the Dungeon Magic Pack - which are currently available on Gumroad. I'm going to start small and work my way up from there. I still have the Elf to finish and I should have that done by the 18th if my scheduling is correct (it might change if I get a call back from a job interview I had recently - yay \o/)
Potions Showsheet
I'm pretty damn excited to see that after a bunch of time off, I've gotten back into the swing of things so quickly. This project is obviously something special.
I've also added a donations section to Gumroad with a wallpaper of 1920x1080 as a reward. I think I might change these to represent the items I've made when I have enough to create a scene.
I've got my internship work at Invisibit Studios go check them out. They're creating a little game with a robot called BIP. He's quite cute and I'm working on animations for him and his friends - along with a fellow colleague Chris Hill (who doesn't seem to have a website).
I've bought a commercial license for license for Photoshop and after a bunch of hunting I've got myself an N52te :D for really, really cheap (20 Pounds). It has made changing programs between Max, Maya and Blender so much smoother. But I will say, there aren't enough buttons for Blender - which is seriously shortcut heavy. But it is still a blessing for changing between programs. I even use it for Photoshop.
With this I've managed to get back into Maya animation. It's something I've been interested in but never took the time to learn. I'm quite comfortable with it all now and pressing play, going through the frames is much easier since I've bought this keyboard extension. I don't need to press Alt+. to go one frame to the right any more it's just a button press.
I've started streaming again! Sign up and follow for email updates. I'll post on twitter when I'm streaming @tajunshadow. I like how it keeps me focused. I'm even streaming for Invisibit Studios and my Maya experimentation.
Streaming is back Follow me for updates.
TL;DR:
- I've had to take time off for personal reasons. But now I'm back from Outta Space.
- Job interview last week and am waiting for a result.
- I've been working on my internship (with Invisibit Studios).
- Got a great review from Invisibit Studios
- Still working on my Taj Packs - 14 packs - about 125 items in total. Go buy them.
- Donations section in Gumroad. Please contribute - you'll get a wallpaper.
- Now can legally sell items made with Photoshop :D I own a commercial license.
- I think my designing has grown stronger with the Taj Packs project.
- I'm learning Maya animation. It seems to be going well.
- I've started streaming again sign up and follow for email updates.
- I'm more active on twitter @tajunshadow
- Hurray art!
Cheers guys!
- ShadowTajun
A long journey though Normal Map Jungle
After a long, long journey of trying to get the body of all the characters 'working' I can finally say that I'm through to the other side. Pretend that this is a sort of Post Mortem of a project just finished. Please note that this will be a long post. And I will sum up my feelings using gifs of American TV Hosts/Comedians and The Muppets. You have been warned.
Now that I'm looking for jobs in the UK I didn't want to mention the difficulty I was facing with my normal maps before today. However I feel like I've learnt from the whole experience and I should talk through what happened, what I did, what I didn't do and how much I cried or possibly didn't cry (>.>).
I never wanted to admit it before, but this is the first time I've followed this process. Generally I'm very diffuse map driven. I will model a character that I have model sheets for (either drawn by me, or someone else) and then unwrap, texture by hand the details, shading and colours; rig, apply weights and then animate. Voilà! A complete model with absolutely no normal maps.
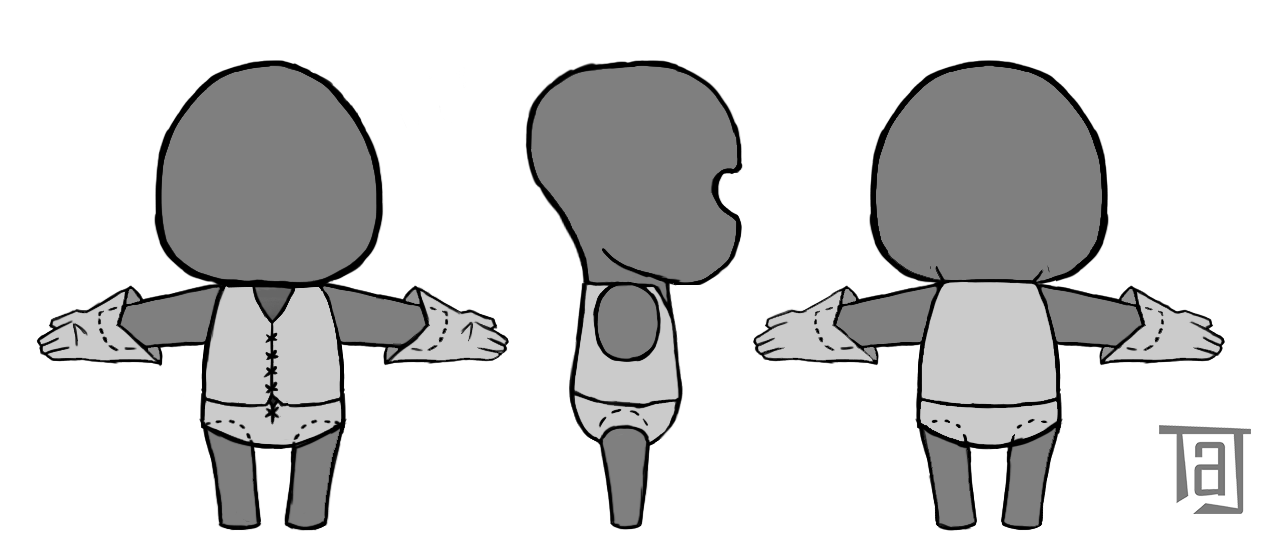
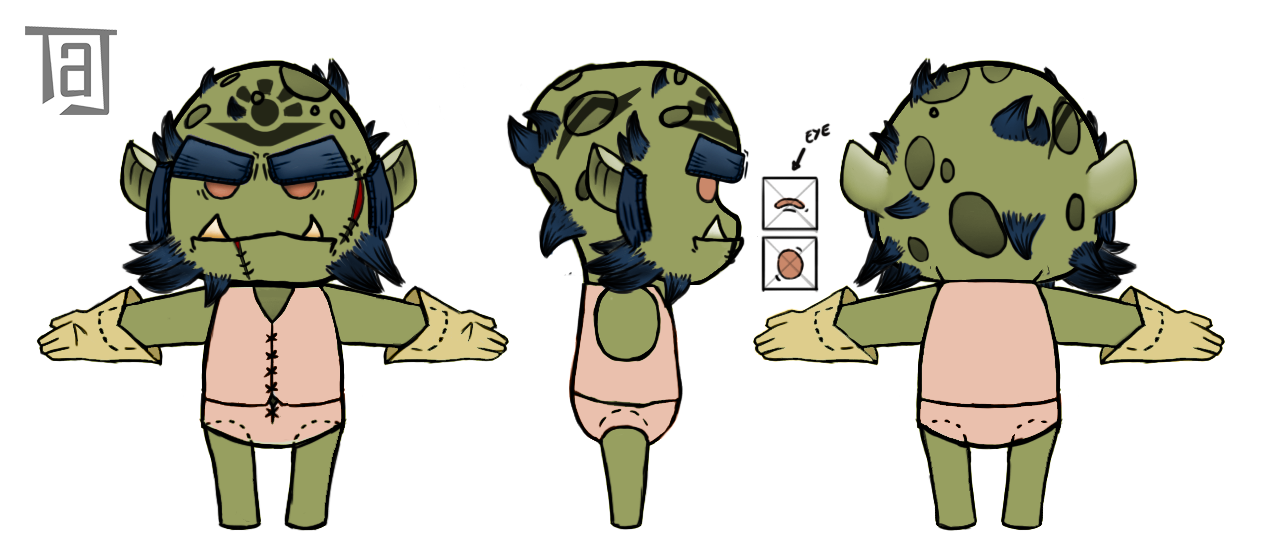
This is the model sheet of the mesh I'll be talking about.
This time around I used unfamiliar programs as well. As you'll know by reading through my blog, I've used Zbrush only a few times before and I've never used Blender or Xnormal before this project. I might be comfortable with Zbrush (I feel my knowledge is beyond beginners) but as for blender, while fairly simple to pick up and work with so far - I've not completed the rigging or animation; I am willing to say that I am still very much a beginner. There are very primitive processes in Blender that would have taken me minutes to work out in 3dsmax compared to hours in Blender (unwrapping is a big example of that). I feel like there isn't much to learning Xnormal, I understand what I'm doing to get what I need but I don't understand how. It was a fast but tough learning curve and I'm still very much a beginner (but a competent beginner).
As for this journey, the process I followed this time around was to create normal maps, which I've never tried before. The only reason I'm creating these normal maps is so that the buyer of my characters has everything they need, I don't want them missing out on anything. Also with normal maps, it's easy enough to make AO maps, Specular maps (although not entirely reliable) and displacement maps.
It started when I first created my character's body in zbrush - some of these images you've seen before.
"The character had little folds in his legs and arms, a cross in his bellybutton, swirls on every elbow, knee and knuckle. I thought he looked quite good"
This took a while but after I figured out what hands and the legs should actually look like, I was good to go (I'm not focusing on the orc features - they took longer to zbrush but were finished sooner with my normal maps). The character had little folds in his legs and arms, a cross in his bellybutton, swirls on every elbow, knee and knuckle. I thought he looked quite good. I decimated him and placed him into Blender to work on retopology.
I researched low topology specs for games in iOS, and Android. I wanted to make sure these characters were low enough to have many of them on an Over The Top Tower Defense game like OTTTD or a small RPG like the old final fantasy games. Mostly, I wanted to make them into little sprites for Roll 20 (which is what I was going to use them for). I wanted to make sure that the topology was clean, crisp and essential.
So I found a few Polycount forum posts:
- Low Poly Hardware Specs
- Triangle counts for assets from various videogames
- Polycounts in next gen games thread! (Not very useful to me for this project)
and beyond3D forum post which has the same name RSART's 'yes but how many polygons' and 'how many polygons in a piece of string' articles.
Here's what really caught my eye:
“Hawken said:
iPhone 3G:
suggested polygon count for performance (total visible): 7000
texture memory: 24MB
max texture size: 1024px x 1024px
screen colour depth: 16-bit (65,536 colours)
alpha blending: free! (use PNG)
suggested texture size: under 512 x 512
—
Nintendo DS:
suggested polygon count for performance (total visible): 2000
texture memory (per screen): 512kb
max texture size: 1024px x 1024px
screen colour depth: 18-bit (260,000 colours)
alpha blending: 5-bit (32 colours)
suggested texture size: under 128 x 128
——
Add3r said:
Windows Phone (Information gathered via Tech demos/Bench Marks):
- Tris on Screen (comfortably): 30k, these were static meshes, using 256*256 textures
- Max Texture Size: 2056, might be higher, I know this number is shared with the xbox 360, as they share many caps when it comes to game development. Obviously the phones cant handle the same loads (this should obviously be common knowledge... I hope)
- Can support up to 72 bones per character
- No Normal map support, just diffuse (not sure about specular, didn’t make it into our benches)”
Now I had a starting point. I knew that iPhone 3G was quite old (3 and a bit generations) so I could have a little leeway with these specs and tailor them more towards the window phone specs. I was happy with this information and got to work.
And I worked faster than I thought I would. Blender has a very interesting snap to feature and it made everything fairly simple.
I worked on the topology polycount (triangles) to make sure if I had to add extra loops in for deformation I could do so with ease and without disrupting the polycount too much. I ended up with 688 tris for the main body and 894 tris for the Orc Features a total of 1582 tris for a main character. For me, this was in the right ballpark (throughout this process I've had BitGem as someone I really want to aim to be like - and his/her main characters have a polycount of 2000+).
Orc Total
I was quite happy with my work. This reminds me, I still need to watch Muppets Most Wanted...
I then Unwrapped the model, the unwrapping feature in blender is primitive and I would like some more options like 3dsmax has but I was able to make it work, even though I was extremely frustrated with this part of the process. I learnt the hard way that saving, and saving the images you're painting are two different shortcuts. Cue the Normal maps part of this journey.
I started with exporting out the high poly version of my character from Zbrush as an obj. I then exported the lowpoly version from Blender, as an obj. After this I opened Xnormal, imported the highpoly mesh and imported lowpoly mesh. I pressed "Generate Maps" and such a mess came out - there were holes in my map and I didn't understand.
"Nothing was working."
I tried with a cage and without a cage. I was told that the 'ray distance calculator' would help a bit with my map generating. Nothing was working. Then I noticed that with all the noise showing up on the maps, I should definitely separate the orc features from the main body. There was less of an issue, but I still had holes in the normal maps and I couldn't understand why there were large streaks of colour that seemed out of place.
So I took a break, I worked on a normal map alternative because I couldn't figure out any way to fix these normals. This alternative I was hoping to place in a program like CrazyBump or Ndo and get the normal map from the 'height map' I had created. I took reference from the normal maps I had generated and hoped that this normal map was what I wanted.
"If you've ever been told to test before you finish, you should do that... Seriously..."
If you've ever been told to test before you finish, you should do that... Seriously... Of course, I was in my own little struggling world but as I finished texturing in the under garments for my orc and started on the little swirls of his knuckles, I decided I should test if this theoretical height map to normal map idea would actually work. To my delight, It sort of did. But not the way I wanted it to. I made a flat normal map from this height map, which would be useful for a ground texture but not any other kind for mesh. *sigh*
So I stopped. I did a little more research and worked on the orc features. Turns out, when I had created the retopology for my character (body and features) I had moved the decimated obj (semi highpoly) down to touch the floor when in Blender *face palm*.
This meant that my normal maps weren't getting projected correctly because the two objects were in totally the wrong position *double face palm*. But I knew the problem now and I can work on that.
This demonstrates the normal map issue
Ughh I felt so stupid when I found that out. I mean seriously "why didn't I see it when I viewed the normal maps as a diffuse"
So I went back into Blender. I had an idea "I wonder if I can get normal maps from Blender" - turns out you can. So I did a bit of research and grabbed the normal maps from the decimated model that was already in Blender. Which worked quite well. I just had fiddly bits to fix. The fingers had seams showing, there were a few seams on the head showing up and some very strong red and green elements around the hands and feet. But this was all in a diffuse view.
I started by trying to play with the head, just smooth those seams a little - it worked a charm then I went down to the finger. This would be harder, so I got colour samples and tried to smooth out the colours by painting a combination of red and green. on the diffuse it seemed to work. but unfortunately as a normal map it wasn't really getting me anywhere. I also realised that I didn't want my fingernails to have as much detail as they did, it wasn't necessary. So tried to blur the finger nails details - this wasn't too bad. but then I noticed that the finger nails weren't in the exact position I wanted them. This would be an issue. At this point I did a test of this texture in the texture slot it was designed for - the normals texture slot.
The normal maps didn't match the diffuse map *triple facepalm*. So back to the drawing board. Should I draw the normal maps and use my diffuse "height" map as a base? Should I go back to the drawing board? Should I check if these seams are fixable?
I had seen a video a while back on hand drawing normal maps and off the top of my head it was just making sure my RGB channels had colours of 128, 128, 255 respectively so neutral grey (X), neutral grey (Y) and then white (Z). So I started playing with the maps. I knew that blue would be the easiest, it's just what is indented so I use the 'working' blender normal maps and tried to adjust their channels. It took some time but I figured out that how to make some of the lines straight and clean on the model. Things were looking up.
The shirt looked much better from behind do I thought that I would place the normal maps into unity with the export for my character.
"I felt happy [...] I had learnt a process by trying, failing, trying, failing, trying and then finally succeeding."
I should have done that long ago. Turns out that my Normals looked inside out *double sigh*. But only in certain directions. I went back do Blender and found that it wasn't just in Unity. There were major seam issues happening under the character too. As much as this would likely never be viewed by anyone, I needed to fix this seam. Research turned up some interesting information about normal maps, sometimes the Y axis needs to be flipped - some programs require that to happen. So I flipped the Y normal in the map and saved it out again.
At first glance it made one hell of a difference. The normals looked great. But then I focused in on some problems areas and the issue was still there as a whole.
Sadly, even with the Y axis flipped the seams were still visible. Just not as much.
The thing is, I knew not to have overlapping faces on normal maps. I knew it and I did it anyway...
While I was doing research I came across a post saying that you should never have overlaying unwraps. *quadruple face palm*. I had done that to make sure I could have more detail on my height map. No wonder things were going wrong. I had to fix this.
I re-unwrapped the whole model and made sure that there were no overlapping faces. I checked that the mesh's face normals were the correct way around and I made sure that there was enough space between the islands.
Once this was done, made sure that when I exported the character base, I exported it as the same height as original mesh was. I checked that I hadn't made a mistake like the previous times, and then did the normal maps via Xnormal.
It worked! or at least initially it worked. On closer inspection the under side of the head, and the shoulders were still mangled. I checked the high poly mesh and found the reason. These two areas were intersecting *headdesk*
Urgh! How had I not seen that before!
I was disappointed that I hadn't figured it out sooner. By this time I knew what had to be done and I could see the light at the end of the tunnel.
Surprisingly accurate feeling at the time. I may have curled up into a ball at that point and then had a break for my birthday.
Back to the drawing board. Well the scuplting table at least.
On the plus side, it only took me a day to import my character, divide it, sculpt the details I really wanted (no swirls, no finger nail details) export it, import it into Xnormal, get a normal map, and test everything in Unity. One day of work... It took me weeks to get to this point.
I was done and I felt happy. Not really because I had finished the problematic part, but more that I had learnt a process by trying, failing, trying, failing, trying and then finally succeeding.
I had redone several weeks of work in a day. I was happy.
I have a few niggling things to play with in the orc features and most things really just show up in the ambient occlusion, which I'll leave out of the diffuse map and keep it as a separate option. Enjoy the rest of the images. These are the screenshots of the orc in Unity and Blender. The red arrows are showing where there are small seam issues.
Sadly, I will have to postpone the selling of the Orc character for the moment. I wish to at least rig the character before I export him and sell him as a complete item. This will take some time.
However, with the orc model complete, I've got a Dwarf and a Tiefling to work on next.
So here I am, exiting stage left until tomorrow. When I will be working on the sculpting of both characters. Enjoy my streams and I hope to see you there.
Kylie Out.
Diffuse maps and timetable adjustments
Hey guys, It's been a slow kind of day but I've eaten lunch, done a tiny shop and am now back to more texturing the tones for my Orc. The face is almost done (YAY!). Just the hair and one eyebrow left with the features. Then I have to go back to playing with the normal maps for the main body.
It's coming together nicely - but texturing had taken a huge chunk out of my timetable. I'll be adjusting my next time table before I start on the next character.
Animations will have to wait for another week. I'm going to go ahead with my previously made starting dates. The next character starts next week.
LiveStream 7 and Other News
Hey guys, sorry for being incognito the past week. I've been at the library which does not have internet fast enough to stream. I did a day of recording but found that difficult and then yesterday I stayed home to stream my work on this guy.
He's 90% done. I just need to place some underwear on him. I'm happy to say that I'm at a part of the process I need to heavily research so there won't be anymore steaming events for the rest of the week.
The videos I worked on at the start of this week need to be 'edited' and then placed up on Youtube. I'll be getting to that by the end of the week :) I'll post a link up when it's complete and setup.
Please subscribe to my channel though to get updates on when I do more live streams. [Link]
Live Stream 3
Edit: Live stream was good. I think I'll be putting the comments section on the laptop with me, doing it via the tablet is taking too long. I'll give it another go for the week but if it irritates me much more, I'm going to just place the comments section up on the laptop screen.
Here's today's work.
I accidentally started working on the other packs I've been thinking of. (I made a Drow from the Elf - oops)
It's raining and windy here in Hove.
A late start today. Starting at half past the hour (I’m getting inspiration at the moment). Come look and listen. I’m still doing model sheets but it’s the last one for the pack.
Yesterday's Tiefling is complete:
Live Streaming 1
Edit: Stream went well.
Here's the finished Orc modelsheet. I'm looking forward to modelling him.
Just a quick post to say I'm starting my Live stream in 15 minutes. (And I plan to do so for 5 days a week unless otherwise stated)
I'm trying a laptop/tablet setup so if I don't answer in chat - it's not you, it's me.


